CADViewer, grazie al suo design flessibile e all’utilizzo di toolkit standard, può essere integrato con qualsiasi applicazione di gestione di database e utilizzato con una moltitudine di applicazioni personalizzate basate sui dati.
Questo tutorial
Questo tutorial si basa sui tutorial di CADViewer Guida - Automatizzare gli hotspot and Guide - Add & Edit Hotspots where a base CAD drawing containing space poloygons on a designated layer been made interactive in CADViewer and then subsequently, interactive content has been added to the CAD drawing.
Questo tutorial illustrerà vari modi di:
- 1: Evidenzia tutto Oggetti spaziali.
- 2: Evidenziane uno singolo ID oggetto spaziale.
- 3: Evidenziare un dato Tipo di spazio.
- 4: Controlla lo stile da evidenziare Confini degli oggetti spaziali.
- 5: Aggiungere Testo in stile a Oggetti spaziali.
- 6: Utilizza l’API per candidarti Apri a Oggetti Spaziali.
- 7: Cancella tutto Punti salienti dagli oggetti spaziali.
- 8: Utilizza l’API per estrarre il contenuto dagli oggetti spaziali.
- 9: Configura il controllo utente del contenuto per Pop-Up Modali Spaziali.
- 10: Nascondi Pop-Up Modali Spaziali e sostituirlo con codice personalizzato.
I passaggi descritti di seguito possono essere testati nel nostro Download versione di CADViewer. Inoltre, usa il nostro esempio online CADViewer_space_objects_canvas_API_640.html come base per questo tutorial
1: Evidenzia tutti gli oggetti spaziali.
L’API CADViewer fornisce una chiamata API per evidenziare uno spazio in base a un oggetto di stile CSS e un ID oggetto spazio.
TIl processo per evidenziare tutto consiste nell’estrarre prima un elenco con tutti gli oggetti Spazio utilizzando il metodo API: funzione cvjs_getSpaceObjectIdList() quindi scorrere l’elenco degli spazi e applicare il colortype dell’oggetto in stile CSS a ciascuno spazio utilizzando funzione cvjs_highlightSpace():
function highlight_all_spaces(){

        // selectedColor is set through color selector in Demo

	var colortype = {
			fill: selectedColor,
			"fill-opacity": "0.8",
			stroke: selectedColor,
			'stroke-width': 1,
			'stroke-opacity': "1",
			'stroke-linejoin': 'round'
		};

	var spaceObjectIds = cvjs_getSpaceObjectIdList();
	for (spc in spaceObjectIds){
		var rmid = spaceObjectIds[spc];
		cvjs_highlightSpace(rmid, colortype);
	}

}
2: Evidenzia un singolo ID oggetto spaziale
L’API CADViewer fornisce una chiamata API per evidenziare uno spazio in base a un oggetto in stile CSS e un ID oggetto spazio ed evidenziare utilizzando: function cvjs_highlightSpace(). Nell’esempio online è stato aggiunto un controllo, quindi viene evidenziato solo uno SpaceID esistente.
function highlight_space_id(){

// selectedColor is set through color selector in Demo

        var spaceid = $('#image_ID').val();

        var colortype = {
			fill: selectedColor,
			"fill-opacity": "0.8",
			stroke: selectedColor,
			'stroke-width': 1,
			'stroke-opacity': "1",
			'stroke-linejoin': 'round'
		};

	var spaceObjectIds = cvjs_getSpaceObjectIdList();
	for (spc in spaceObjectIds){
		console.log(spaceid+"  "+spaceObjectIds[spc]+" "+(spaceid.indexOf(spaceObjectIds[spc])==0)+" "+((spaceid.length == spaceObjectIds[spc].length)));
		if (spaceid.indexOf(spaceObjectIds[spc])==0 && (spaceid.length == spaceObjectIds[spc].length) )
			cvjs_highlightSpace(spaceObjectIds[spc], colortype);
	}
}
3: Evidenzia un determinato tipo di spazio
Il processo per evidenziare tutti i tipi di spazio specificati consiste nell’estrarre innanzitutto un elenco con tutti gli oggetti dello spazio utilizzando il metodo API: funzione cvjs_getSpaceObjectIdList() e quindi scorrere l’elenco degli spazi, controllare se lo spazio ha un determinato tipo utilizzando, funzione cvjs_getSpaceObjectTypefromId(), e applica il colortype dell’oggetto in stile CSS a ciascuno spazio utilizzando funzione cvjs_highlightSpace():
function highlight_space_type(){

// selectedColor is set through color selector in Demo

	var type = $('#image_Type').val();

        var colortype = {
			fill: selectedColor,
			"fill-opacity": "0.8",
			stroke: '#fe50d9',
			'stroke-width': 1,
			'stroke-opacity': "1",
			'stroke-linejoin': 'round'
		};

		var spaceObjectIds = cvjs_getSpaceObjectIdList();
		for (spc in spaceObjectIds){
			var spaceType = cvjs_getSpaceObjectTypefromId(spaceObjectIds[spc]);
			var vqid = spaceObjectIds[spc];
			console.log(spc+"  "+ vqid + "  "+spaceType+ "  "+spaceType.indexOf("Device"));
			if (spaceType.indexOf(type)==0)
				cvjs_highlightSpace(vqid, colortype);
		}
}
4: Stile di controllo per evidenziare i bordi degli oggetti spaziali
L’API CADViewer fornisce una chiamata API per evidenziare uno spazio in base a un oggetto di stile CSS e un ID oggetto spazio.
Il processo per evidenziare Space Borders consiste innanzitutto nell’estrarre un elenco con tutti gli oggetti Space utilizzando il metodo API: function cvjs_getSpaceObjectIdList() and then loop over the list of spaces and apply the CSS style object colortype, with border style, to each Space using function cvjs_highlightSpace():
function highlight_all_borders(){

// selectedColor is set through color selector in Demo

        var colortype = {
		fill: '#fff',
		"fill-opacity": 0.01,
		stroke: selectedColor,
		'stroke-width': 3.0,
		'stroke-opacity': 1,
		'stroke-linejoin': 'round'
		};

	var spaceObjectIds = cvjs_getSpaceObjectIdList();
	for (spc in spaceObjectIds){

		var rmid = spaceObjectIds[spc];
		cvjs_highlightSpace(rmid, colortype);
	}
}
5: Aggiungi testo con stile agli oggetti dello spazio
Layer Testo - dichiarazione e inizializzazione
Il testo con stile su un oggetto spaziale deve essere posizionato su un livello di testo separato. Questo livello dovrebbe essere dichiarato a livello globale.
var textLayer1;
Il livello deve essere inizializzato e cancellato per l’utilizzo tramite il comando API cvjs_clearLayer() prima dell’uso. Una buona posizione per questo � dopo il caricamento del disegno, quindi all’interno della chiamata-metodo di richiamata cvjs_OnLoadEnd().
function cvjs_OnLoadEnd() {
	// ..
	textLayer1 = cvjs_clearLayer(textLayer1);
	//..
}
Comando API per aggiungere più righe di testo all’interno dell’oggetto spazio
La funzione cvjs_AddTextOnSpaceObject(), aggiunge testo su un textLayer in base all’ID dello spazio. L’utente deve impostare array contenenti stili, dimensioni, colore e oggetti di testo. Il metodo fornisce inoltre controlli per centrare e ritagliare il contenuto del testo all’interno dell’oggetto spazio.
/**
 * Add multiple lines of text, individually formatted and styled, inside a Space Object
 * @param {string} txtLayer - layer to apply the text
 * @param {string} Id - Id of the graphical object in which to place the text
 * @param {float} leftScale - distance from the left border of Space Object, value between 0 and 1
 * @param {array} textStringArr - Array with the lines of text
 * @param {array} textStyleArr - Array with textstyle of text lines, formattet as a java script object with css style elements, predefined is: text_style_arial_11pt_bold , text_style_arial_9pt_normal, text_style_dialog
 * @param {array} scaleTextArr - Array with relative scale of text lines in relation to space object height, value between 0 and 1. If 0, using font-size in font object as is.
 * @param {array} hexColorTextArr - Array of color of text lines in hex form, for example: #AA00AA
 * @param {boolean} clipping - true if clipping of text inside of Space Object, false if text to cross Space Object borders
 * @param {boolean} centering - true if centering of text inside of Space Object, false is default
 */

function cvjs_AddTextOnSpaceObject(txtLayer, Id, leftScale, textStringArr, textStyleArr, scaleTextArr, hexColorTextArr, clipping, centering){};
Stili di Testo
Un tipico elemento di stile di testo utilizzato con cvjs_AddTextOnSpaceObject() è una variabile JSON contenente lo stile e le impostazioni del carattere. Di seguito sono riportati alcuni esempi:
/* text style for adding text into Space Objects */
var text_style_arial_11pt_bold = {
	'font-family': "Arial",
	'font-size': "11pt",
	'font-weight': "bold",
	'font-style': "none",
	'margin': 0,
	'cursor': "pointer",
	'text-align': "left",
	'z-index': 1980,
	'opacity': 0.5
};

/* text style for adding text into Space Objects */
var text_style_arial_9pt_normal = {
	'font-family': "Arial",
	'font-size': "9pt",
	'font-weight': "normal",
	'font-style': "none",
	'margin': 0,
	'cursor': "pointer",
	'text-align': "left",
	'z-index': 1980,
	'opacity': 1
};

/* text style for adding text into Space Objects */
var text_style_arial_14pt_normal = {
	'font-family': "Arial",
	'font-size': "14pt",
	'font-weight': "normal",
	'font-style': "none",
	'margin': 0,
	'cursor': "pointer",
	'text-align': "left",
	'z-index': 1980,
	'opacity': 1
};

/* text style for adding text into Space Objects */
var text_style_dialog = {
	'font-family': "Dialog",
	'font-size': "9pt",
	'font-weight': "normal",
	'font-style': "italic",
	'margin': 0,
	'cursor': "pointer",
	'text-align': "left",
	'z-index': 1980,
	'opacity': 1
};
Esempio con più righe di testo
Il processo per aggiungere più righe di testo con stile all’oggetto Space consiste innanzitutto nell’estrarre un elenco con tutti gli oggetti Space utilizzando il metodo API: funzione cvjs_getSpaceObjectIdList() quindi scorrere l’elenco degli spazi e applicare il testo a ciascuno spazio utilizzando funzione cvjs_AddTextOnSpaceObject().
// This is the function that illustrates how to label text inside room polygons
function customAddTextToSpaces(){
// I am making an API call to the function cvjs_getSpaceObjectIdList()
// this will give me an array with IDs of all Spaces in the drawing
var spaceObjectIds = cvjs_getSpaceObjectIdList();
var i=0;
var textString ;
var textStyles ;
var scaleText ;
var hexColorText;
for (var spc in spaceObjectIds)
{
	//console.log(spaceObjectIds[spc]+" "+i);
	if ((i % 3) ==0){
		textString = new Array("Custom \u2728", "settings \u2728", "\u2764\u2728\u267B");
		textStyles = new Array(text_style_arial_9pt_normal, text_style_arial_11pt_bold, text_style_dialog);
		scaleText = new Array(0.15, 0.2, 0.15 );
		hexColorText = new Array("#AB5500", "#66D200", "#0088DF");

		// here we clip the roomlables so they are inside the room polygon
		cvjs_AddTextOnSpaceObject(textLayer1, spaceObjectIds[spc],  0.05, textString, textStyles, scaleText, hexColorText, true, false);

	}
	else{
		if ((i % 3) == 1){

			textString = new Array('Unicode:\uf083\uf185\u2728', 'of custom text');
			textStyles = new Array(FontAwesome_9pt_normal, text_style_dialog);
			scaleText = new Array(0.15, 0.15 );
			hexColorText = new Array("#00D2AA", "#AB0055");

			// here we clip the roomlables so they are inside the room polygon
			cvjs_AddTextOnSpaceObject(textLayer1, spaceObjectIds[spc],  0.1, textString, textStyles, scaleText, hexColorText, true, false);

		}
		else{

			textString = new Array("\uf028");
			textStyles = new Array(FontAwesome_9pt_normal);
			scaleText = new Array( "0.5" );
			hexColorText = new Array("#AAAAAA");
			//var hexColorText = new Array("#00AADF");

			// here we clip the roomlables so they are inside the room polygon, we center object
			cvjs_AddTextOnSpaceObject(textLayer1, spaceObjectIds[spc],  0, textString, textStyles, scaleText, hexColorText, true, true);
		}

	}
	i++;
}
Esempio con testo centrato su riga singola
Il processo per aggiungere una singola riga di testo in stile centrato su un oggetto spaziale consiste innanzitutto nell’estrarre un elenco con tutti gli oggetti spaziali utilizzando il metodo API: funzione cvjs_getSpaceObjectIdList() quindi scorrere l’elenco degli spazi e applicare il testo a ciascuno spazio utilizzando funzione cvjs_AddTextOnSpaceObject().
Note: Il fattore di scala sinistro, leftScale, è impostato su -0,3 per spostare il testo del 30% a sinistra della posizione centrale dell’oggetto spaziale nella direzione dell’asse x.
function customAddIDToSpaces() {

	// First an API call to the function cvjs_getSpaceObjectIdList()
	// this will me an array with IDs of all Spaces in the drawing
	var spaceObjectIds = cvjs_getSpaceObjectIdList();
	var textString;
	var textStyles;
	var scaleText;
	var hexColorText;

	for (var spc in spaceObjectIds) {
		textString = new Array(spaceObjectIds[spc]);
		textStyles = new Array(text_style_arial_14pt_normal);
		scaleText = new Array("0");    // scale in relation to object height, if zero use font-size as is.
		hexColorText = new Array("#000");
		cvjs_AddTextOnSpaceObject(textLayer1, spaceObjectIds[spc], -0.3, textString, textStyles, scaleText, hexColorText, true, true);
	}

}
Cancella il livello di testo
Ogni volta che è necessario cancellare il livello testo, è sufficiente chiamare il comando API cvjs_clearLayer():
textLayer1 = cvjs_clearLayer(textLayer1);
}
6: Utilizza l’API per applicare il tratteggio agli oggetti spaziali
La funzione funzione cvjs_hatchSpace(), fa schiudere un oggetto spaziale in base all’ID spazio, al colore del tipo di tratteggio e all’opacità. Il metodo supporta 14 diversi tipi di portelli.
/**
 * Apply a predefined pattern on a graphical Space Object
 * @param {string} rmid - Id of the Space Object object to add hatches
 * @param {string} graphicalPattern - name of the hatch pattern, from a predefined list of patterns:
 *  	        "pattern_45degree_standard"
 *		"pattern_45degree_fine"
 *		"pattern_45degree_wide"
 *		"pattern_90degree_standard"
 *		"pattern_90degree_fine"
 *		"pattern_90degree_wide"
 *		"pattern_135degree_standard"
 *		"pattern_135degree_fine"
 *		"pattern_135degree_wide"
 *		"pattern_0degree_standard"
 *		"pattern_0degree_fine"
 *		"pattern_0degree_wide"
 *		"pattern_45degree_crosshatch_standard"
 *		"pattern_45degree_crosshatch_fine"
 * @param {string} colorHex - color of hatch in hex form, for example: #FF0000
 * @param {float} fillOpacity - fill opacity of pattern, value between 0 and 1
 */
Il processo per tratteggiare l’oggetto spazio consiste nell’estrarre innanzitutto un elenco con tutti gli oggetti spazio utilizzando il metodo API: funzione cvjs_getSpaceObjectIdList() quindi scorrere l’elenco degli spazi e applicare il metodo di tratteggio utilizzato da ciascuno spazio funzione cvjs_hatchSpace().
// hatch spaces

var hatchtype = 0;

function customHatchSpaces(){
    // I am making an API call to the function cadviewer.cvjs_getSpaceObjectIdList()
    // this will give me an array with IDs of all Spaces in the drawing
    var spaceObjectIds = cvjs_getSpaceObjectIdList();


    for (var spc in spaceObjectIds)
    {
		hatchtype++;
    	if (hatchtype >4) hatchtype=1;


		if (hatchtype == 1) cvjs_hatchSpace(spaceObjectIds[spc], "pattern_45degree_crosshatch_fine", "#550055" , "0.5");
		if (hatchtype == 2) cvjs_hatchSpace(spaceObjectIds[spc], "pattern_45degree_standard", "#AA2200" , "0.5");
		if (hatchtype == 3) cvjs_hatchSpace(spaceObjectIds[spc],  "pattern_135degree_wide", "#0055BB" , "0.5");
		if (hatchtype == 4) cvjs_hatchSpace(spaceObjectIds[spc],  "pattern_90degree_wide", "#220088" , "0.5");
    }

};
7: Cancella tutte le evidenziazioni dagli oggetti spaziali
Quando si cancella CADViewer per le evidenziazioni, è necessario cancellare due oggetti diversi:
- 1: Il livello back-end su cui vengono disegnate le evidenziazioni viene cancellato tramite la chiamata API: funzione cvjs_clearSpaceLayer()
- 2: Eventuali livelli specifici utilizzati per le decorazioni del testo devono essere cancellati e restituiti utilizzando: funzione cvjs_clearLayer()
// in the demo sample, text decorations in Space Objects are done on the layer textLayer1.

function clear_space_highlight(){

	cvjs_clearSpaceLayer();
	textLayer1 = cvjs_clearLayer(textLayer1);
}
8: Utilizza l’API per estrarre contenuti da Oggetti Spazio
La funzione cvjs_returnAllSpaceObjects, restituisce il contenuto di tutti gli oggetti spaziali come oggetto JSON. Questo oggetto JSON puÒ quindi essere analizzato per valori specifici. Nel caso di esempio riportato di seguito, gli spazi e la relativa area calcolata vengono estratti ed elencati.
////////// FETCH ALL SPACE OBJECTS

function display_all_objects(){


/* Return a JSON structure with  all Space Object content, each entry is of the form: <br>
 * 	SpaceObjects :[  	{	    "path":   path, <br>
 *								"tags": tags, <br>
 *								"node": node, <br>
 *								"area": area, <br>
 *								"outerhtml": outerHTML, <br>
 *								"occupancy": occupancy, <br>
 *								"name": name, <br>
 *								"type": type, <br>
 *								"id": id, <br>
 *								"defaultcolor": defaultcolor, <br>
 *								"layer": layer, <br>
 *								"group": group, <br>
 *								"linked": linked, <br>
 *								"attributes": attributes, <br>
 *								"attributeStatus": attributeStatus, <br>
 *								"displaySpaceObjects": displaySpaceObjects, <br>
 *								"translate_x": translate_x, <br>
 *								"translate_y": translate_y, <br>
 *								"scale_x": scale_x ,<br>
 *								"scale_y": scale_y ,<br>
 *								"rotate": rotate, <br>
 *								"transform": transform, <br>
 *								"svgx": svgx, <br>
 *								"svgy": svgx, <br>
 *								"dwgx": dwgx, <br>
 *								"dwgy": dwgy } <br>
 * @param {string} spaceID - Id of the Space Object to return
 * @return {Object} jsonSpaceObject - Object with all space objects content
 */


  //   get json obhect with all spaces processed from drawing
  var allSpaceObjects = cvjs_returnAllSpaceObjects();

  var myString = "";
  for (var spc in allSpaceObjects.SpaceObjects){
    console.log(spc);
    myString += "("+allSpaceObjects.SpaceObjects[spc].id+", "+allSpaceObjects.SpaceObjects[spc].area+")";
  }

  window.alert("The spaces with area (id,area): "+myString);

}

////////// HIGHLIGHT METHODS START
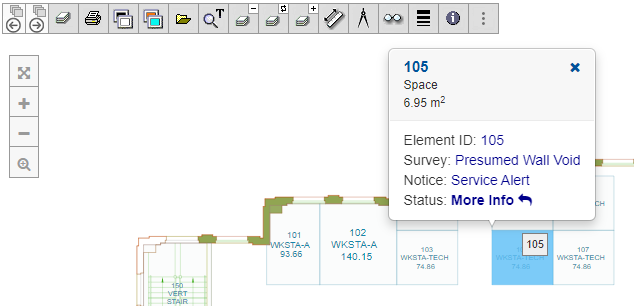
9: Configura i controlli utente per le modalità spaziali pop-up
CADViewer consente ai programmatori di applicazioni di rilevare una richiamata quando si fa clic su un oggetto e di impostare dinamicamente il contenuto del popup modale. Ciò consente ai programmatori di applicazioni di interagire con un database o un back-end e di fornire contenuto specifico dell’oggetto alla finestra modale popup nell’area di disegno di CADViewer.
Consulta la documentazione dettagliata nella sezione Modali dinamici per evidenziare. E leggi la sezione Modali Personalizzati per Evidenziare sull’impostazione base dei modali.
10: Nascondi modali spaziali pop-up personalizzati
I programmatori dell’applicazione possono assumere il controllo delle modalità pop-up, nascondere le modalità CADViewer standard e sostituirle con la propria interfaccia, leggere la sezione seguente Suppress/Exchange Highlight Modals.